Azure Site Recovery Capacity and Planning

Before any project begins it is essential to perform proper planning to ensure a successful project, measure twice, cut once mentality.  Azure Site Recovery (ASR) provides a pure cloud-based alternative to expensive secondary datacenters.  ASR can be used purely for disaster recovery scenarios, but also can be used for lift-and-shift migrations to Azure Infrastructure as a Service (IaaS).  To assist in the discovery of ASR and proper deployment measures, Microsoft created the ASR Deployment Planning tool.


The ASR Deployment Planning tool is a command-line tool for both Hyper-V and VMWare.  This tool primarily replaces the former ASR capacity planner spreadsheet, which is still available for download for a quick estimate based on manual input.  When the ASR deployment planning tool is run properly, you will get a very detailed report regarding VM eligibility, required bandwidth per your RPO, on-premises and Azure requirements, replication guidance, as well as a detailed cost estimate of the overall ASR investment.  The ASR Planning tool needs to run on either a Windows Server 2012 R2 or Windows Server 2016 machine with 8 CPU cores, 16GB RAM, and 300GB HDD.  For Hyper-V assessments, this server must be added to the TrustedHosts list on all Hyper-V servers.  Additionally, all VMs to be assessed must be added to the TrustedHosts list of the server running the assessment.  For VMWare, vCenter statistics level should be set to 2 or higher and the account running the assessment should have at minimum Read-Only permissions for all vCenter servers and ESXi hosts.

There are four primary phases in the deployment planner tool, Profiling, Report Generation, and Throughput. 

Get VM List: Obtain a list of VMs to be profiled.  For Hyper-V, you can use the deployment planning tool to create a list.  For VMWare, you need to use VMWare vSphere PowerCLI.  For either environment, you can generate this list manually, although not recommended to ensure accuracy. The results of this task provides a text file to be used with the remaining phases. 


Profiling: In profiling mode, the deployment planner tool connects to Hyper-V Host\Cluster or vCenter to capture performance metrics regarding the function of the VM.  By default, the tool can only profile up to 1000 VMs.


Report:  Generates a macro enabled Microsoft Excel file using the data collected from the Profiling phase.  Provides summary and much detail regarding the requirements and costs of an ASR deployment


Throughput:  Used to estimate the throughput that ASR can achieve from on-premises to Azure during replication.  These results will assist in network planning for initial and ongoing replication.


Get VM List Phase

For VMWare, you need to use PowerCLI to obtain a list of VMs from each vCenter server or ESXi host. 


Connect-VIServer -Server <servername> -User <username> -Password <password>

Get-VM | Select Name | Sort-Object -Property Name > <outputfile.txt>

For Hyper-V, the initial phase requiring you to obtain a list of all VMs is included in the deployment planning tool.  To start, you will need to create a text file containing a list of all Hyper-V cluster and/or host names or their IP address.  Then within an administrative PowerShell session, run ASRDeploymentPlanner.exe -Operation GetVMList.  This will prompt you for the server list as well as username and password to connect to Hyper-V.  Once you have the completed list you are free to manually add or remove any VM from the list. 

Profiling Phase

The profiling phase is where most of the discovery and data gathering is done.  In profiling mode, the tool connects to each Hyper-V Host/Cluster or vCenter servers to gather performance metrics for each VM in the list.  This tool should not affect overall performance of the VMs being profiled. You can run multiple instances of the tool in profiling mode with the only limitation is that you cannot run the tool against a VM that is already being profiled.  Doing so will generate invalid report data.  Profiling can be run for as little as 30 minutes.  It is recommended to run the profiling for a production environment for no less than 7 days, but ideally 31 days.  Running for an entire month will provide the most accurate recommendations in the report. 


To start the profiling, run ASRDeploymentPlanner.exe -Operation StartProfiling in an administrative PowerShell session.  All required parameters will have prompts to identify virtualization platform, VM List, time to profile, and username and password.   You can optionally pass Storage Account Name and Key parameters to provide throughput metrics during.  Without this, throughput cannot be calculated, but you can perform an ad-hoc throughput analysis later.  Once the profiling is started, do not close the PowerShell session.  If closed, the profiling will stop at that point, but the data will still be collected from the time it began.

Report Phase

The third phase involves generating a report from the data collected during profiling.  Once the profiling is complete, several files are generated in the profiling directory including:


  • xml containing VM configurations
  • CSV files for each VM assessed containing all performance counter metrics captured during profiling


These files should not be deleted until you have generated the report for the assessment.  To start the report generation run the following in an administrative PowerShell session, ASRDeploymentPlanner.exe -Operation GenerateReport.  Again, this will prompt for all required parameters including virtualization platform and VM list.  Additional parameters can be specified such as DesiredRPO, GrowthFactor, and several cost-estimate affecting parameters that can alter the results of the report. 

The completed report is an Excel Spreadsheet containing multiple tabs.  The following table describes each tab.


On-premises summary

Provides an overview of the on-premises summary of information collected including number of VMs, Average disk, etc.

Recommendations

Provides Microsoft based recommendations per the selected RPO.  You can select 15, 30, or 60 minutes.  See below for sample output of the report.

VM-Storage Placement

Provides recommendations on the type of disks and storage accounts to use in Azure

Compatible VMs

Lists all compatible VMs and their Azure sizing and configuration recommendations

Incompatible VMs

Lists all incompatible VMs along with reason for incompatibility and current VM specifications

On-Premises storage requirements

Hyper-V Only.  Hyper-V requires additional on-premises local storage for successful initial and delta replication since it takes snapshots of each VHD.  This tab shows how much space is required for each Hyper-V host.

IR batching

Hyper-V Only.  Initial Replication batching creates recommended batches for the initial replication of VMs due to the additional storage requirements.

Cost Estimation

Provides a detailed cost summary and analysis based on the results.  See below for a sample cost summary.  The detailed analysis further breaks down each item and their associated cost.

Throughput Phase

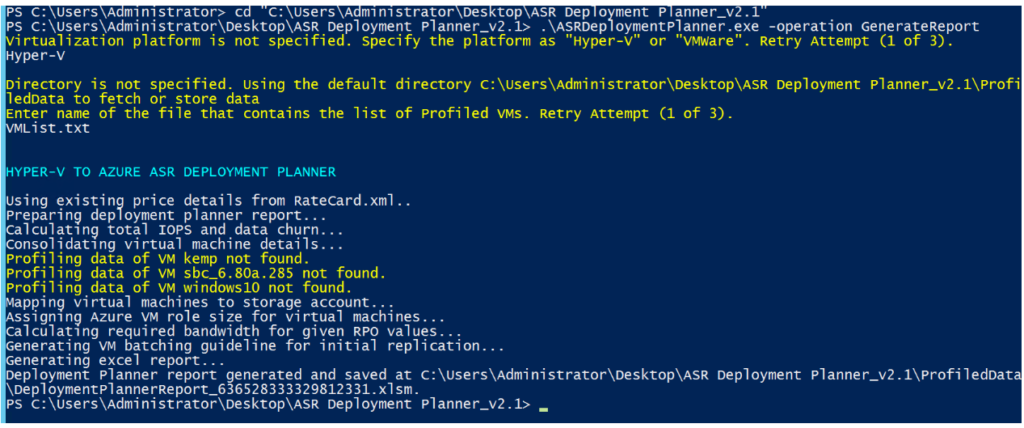
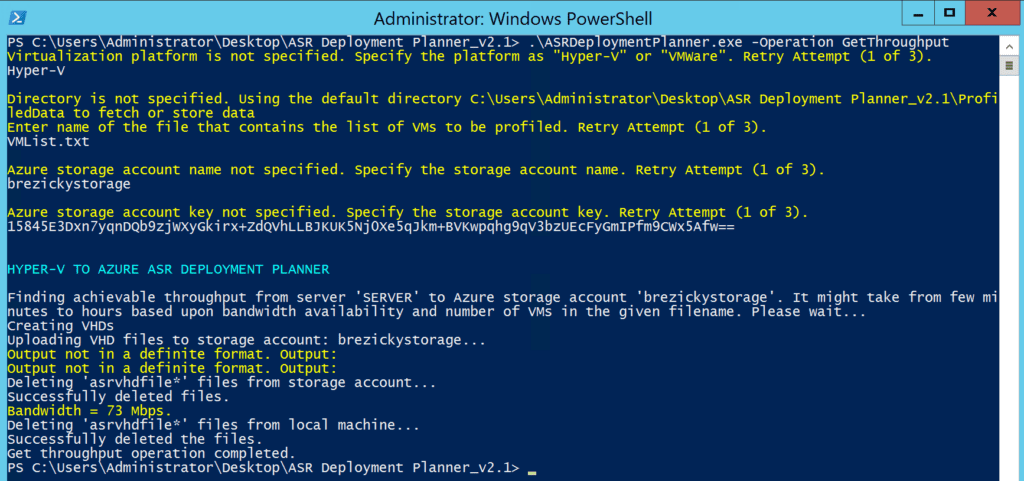
The final phase is completely optional but allows you to estimate the throughput that ASR can achieve during replication.  If you did not do this as part of the profiling phase it is recommended to perform this step to get an ideal of network usages ASR will consume.  This creates 64MB VHD files and uploads the files to the storage account to determine the capable throughput.  The VHD files are deleted from the Azure storage account and the local server once completed.  The measured throughput is only for the specific period that it was run and can vary depending on environmental circumstances.  Run the following in an administrative PowerShell session ASRDeploymentPlanner.exe -Operation GetThroughput -StorageAccountName brezickystorage -StorageAccountKey 15845E3Dxn7yqnDQb9zjWXyGkirx+ZdQVhLLBJKUK5Nj0Xe5qJkm+BVKwpqhg9qV3bzUEcFyGmIPfm9CWx5Afw==.  You will be prompted for the virtualization platform and VM List as well as Storage Account Name and Key if not specified.  You can run this command multiple times to get a solid average throughput. 

Proper planning is key to any successful project.  The ASR Deployment planning tool provides the necessary tools to identify specific requirements needed to implement ASR, whether for disaster recovery or lift-and-shift migrations, as well as a close cost estimate to properly prepare your budget.  Our next article will go over the setup and initial deployment for ASR.  Contact Enabling Technologies to allow us to see how we can assist with your BCDR or Azure migration goals.  You can also check out our other Azure offerings at our Azure page on our website.

Contact our team of experts today to help with everything from planning to deployment on your next Azure project! info@eGroup-us.com

Last updated on July 31st, 2023 at 01:18 pm