Windows 365 Deployment: Initial Setup and Configuration

In the first part of this series, we discussed the necessary steps to properly prepare for a Windows 365 Enterprise environment.  Once you have done your due diligence and are ready to proceed with the deployment phase, you will need to perform several initial setup tasks and then understand the lifecycle of a Cloud PC.  In this part, we will walk through the required configuration and setup tasks necessary to begin provisioning Cloud PCs.

The setup of Windows 365 Enterprise requires the use of Azure Active Directory (or Microsoft 365 Admin Center) for licenses and Microsoft Endpoint Manager for configuration (MEM Admin Center can also be used for license assignments).  You are required to manually setup any necessary Azure Networking components from the Azure Portal or PowerShell/CLI.  The Azure Virtual Network and subnet to be used must already be created in advance of this setup along with connectivity to your Active Directory Forest.  The virtual network must have Network access to/from Microsoft Endpoint Manager network endpoints. 

Prerequisites

You are required to have the necessary permissions to perform all tasks within Microsoft Endpoint Manager. That means the account used to perform the initial setup requires both of the following: 

  • Intune Administrator role  
  • Owner permissions on the Azure Subscription where the virtual network is deployed 

Initial Setup

There are 3 necessary tasks for the initial setup of Windows 365 Enterprise, as well as two additional optional tasks. 

  1. Assign licenses 
  2. On-premises network connection
  3. Provisioning policy 
  • (Optional) Localized Windows experience 
  • (Optional) Custom device images 

Assign Licenses

No new magical process with the first task of assigning a license to a user. Each Windows 365 instance is represented as a license in your Azure AD and/or Microsoft 365 tenant. A single user can only have one instance\license of any given size assigned to them. However, you may assign multiple different licenses of different sizes to a single user. Follow existing practices to assign licenses to your users. eGroup | Enabling Technologies recommends Azure AD Group Based Licensing. 

  • For Business licenses, this is all the is required and a Cloud PC will automatically be provisioned. 
  • For Enterprise licenses, assigning a license does not automatically provision a Cloud PC, but must be done before a Cloud PC is provisioned. 


Also note that Microsoft recently announced the depreciation of Azure AD and Microsoft 365 PowerShell modules starting with license assignments. If you are still assigning licenses via scripts, consider changing to Group Based Licensing or update your scripts to use Microsoft Graph PowerShell. 

Create On-Premises Network Connection

On-premises network connections (OPNC) are necessary to tie together your Windows 365 deployment with your Active Directory Forest. Currently, all Windows 365 Enterprise Cloud PCs must be joined to your Active Directory domain and become Hybrid Azure AD Joined. In future updates, it will also be possible for Azure AD Joined Cloud PCs. 

You can create up to ten (10) OPNC per Azure AD tenant.  Each OPNC will grant the Windows 365 service the following permissions on your Azure resources: 

To create an OPNC, go to MEM Admin Center > Devices > Windows 365 > On-premises network connection and click create connection. 

There are two tabs that require inputs. The first tab is the Azure Network details and the second is the AD Domain details. The chart below lists each setting and description. 

Once an OPNC is created, health checks are performed to ensure that Cloud PCs are successfully provisioned. If any of these checks are in a failed state, the OPNC will not be used to provision Cloud PCs until resolved. 

Provisioning Policy

The final required component for the initial setup is to create a provisioning policy. The purpose of these policies is to tie together the correct OPNC, Image, and User to create the appropriate Cloud PC. With a healthy OPNC and licensed user, once a provisioning policy is assigned to a user, a Cloud PC will be automatically provisioned. If the OPNC is in a failed state, or a user is not yet licensed, a Cloud PC will not be provisioned until either or both OPNC is healthy, and the user is licensed. 

A user can be assigned to multiple provisioning policies; however, only the first policy assigned will be used to provision a Cloud PC. Any changes made to the provisioning policy after Cloud PCs have been provisioned, such as a different image or OPNC, will not affect already provisioned Cloud PCs, only newly provisioned Cloud PCs. Existing Cloud PCs would require a reprovision (Reset) to apply any changes made. 

To create a provisioning profile, go to MEM Admin Center > Devices > Windows 365 > Provisioning policies and click create policy.  

There are three (3) tabs that require input, General, Image, and Assignments:

Cloud PCs will begin to provision within 60 minutes of creation of the provisioning policy.  They will automatically join Active Directory, become Hybrid Azure AD Joined, Enroll into Intune and obtain any policies, profiles, or apps assigned.

Localized Windows Experience

Localized Windows experience is an optional task for a Windows 365 Enterprise deployment.  It may not be required in every deployment. The primary purpose of this task is to configure a default language for your Cloud PCs upon first login for optimal experience for users in global organizations that may have many primary spoken languages across the organization.

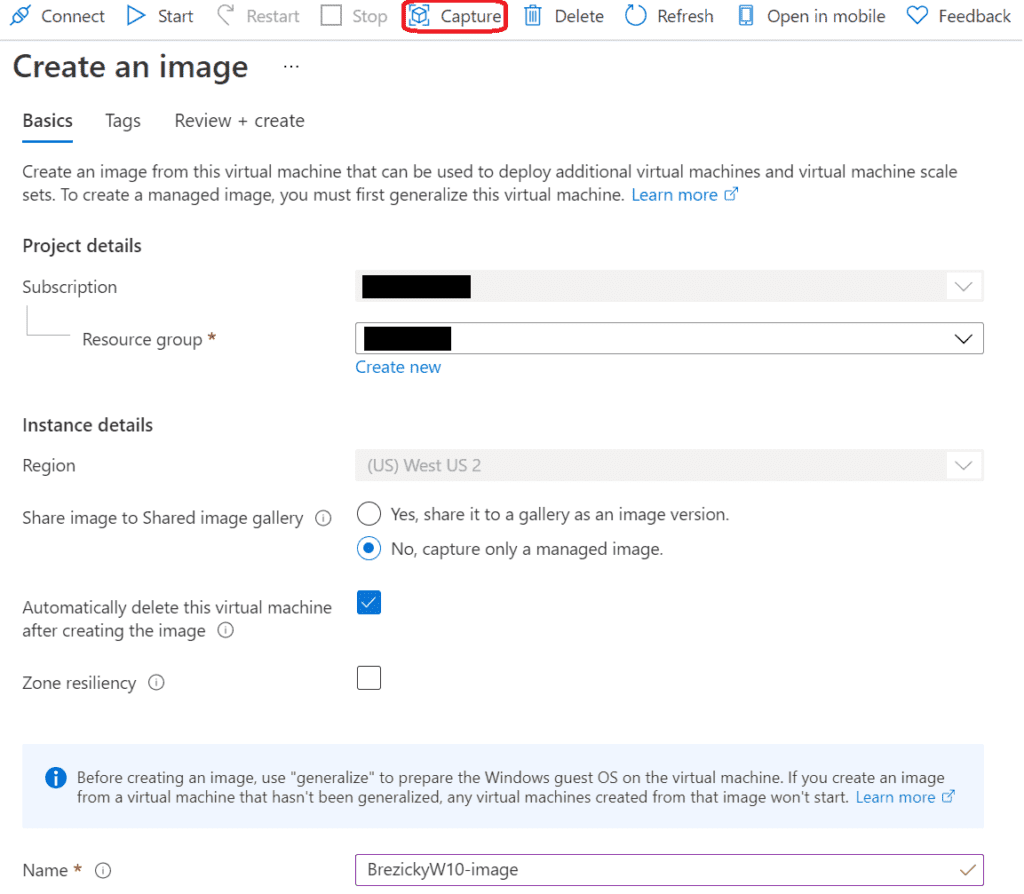
  • Install languages on a custom image to be used 
  • Configure Group Policy to set the default language 

For the custom image, you simply install the necessary languages as part of your image build process. Then configure a GPO to apply that language to the Cloud PCs.  Specifically, create a registry item with the following values. For the Language Code, use Microsoft’s supported region tags for the desired language, such as es-ES for Spanish

Device Images

The final optional task for a Windows 365 deployment is device images. Microsoft provides a built-in gallery of images configured with Windows 10 Enterprise. If these images are satisfactory to your business requirements, there is no need to create a custom image. Two sets of images include:  

  • Windows 10 Enterprise with Microsoft 365 Apps 
  • Windows 10 Enterprise with OS Optimizations (designed for smaller sized Cloud PCs) 

These images will also be paired with any Intune configurations and applications assigned to reduce the necessity for a custom image. However, if you still require a customized image, you can create and upload up to 20 device images. Custom images must meet the following requirements:  

  • Windows 10 Enterprise 1909 or later 
  • Hyper-V Generation 1 
  • Generalize VM 
  • 64 GB OS disk 
  • Stored as a managed image in Azure 
  • Stored in the same subscription as the On-premises network connection 

Custom images do incur storage costs within Azure. You can use Azure to easily create your custom image by creating and configuring a VM as desired, generalize the VM, then use the Capture option to create an image. 

Once you have a managed image created you then need to upload it to the Windows 365 Service. To upload an image, go to MEM Admin Center > Devices > Windows 365 > Device images and click add.  

Summary

The configuration of a Windows 365 Enterprise deployment is significantly less complex than an Azure Virtual Desktop deployment. Yet it still offers the ability to define multiple policies and configurations for the all the use cases you may have in your organization, whether that is a single setup for all users, or dozens of scenarios that each require their own dedicated configuration. However, once you have your configuration in place and Cloud PCs are beginning to provision, it is still necessary to understand the lifecycle and operations of those Cloud PCs to provide appropriate support and maintenance to the deployment. That will be discussed in our next article. 

Work with our team of Cloud Computing Consultants with years of experience that know all of the “minefields” to prevent missteps.

Last updated on July 31st, 2023 at 12:43 pm